Log inRegister
 

Top 10 Emotionally Devastating Christmas Moments

Top 10 Emotionally Devastating Christmas Moments

Christmas. It's a time of unbridled joy. Ecstasy, even. But lest we all forget ourselves, strip naked and begin cavorting around the tree, driven mad with pure bliss, BFF has taken the time to compile a list of the top ten film moments that will make you remember the truth: that life is actually a sad, lonely, painful dredge. And that Christmas sucks. Just ask James Van Der Beek. He'll give it to you straight.

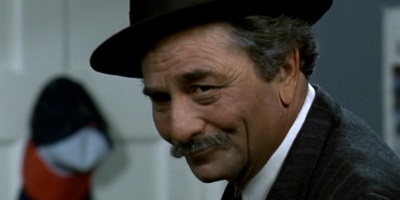
#10 – The world’s most depressing Santa Claus (Trading Places)

John Landis’ 1983 comedy Trading Places centres on con artist Billy Ray (Eddie Murphy) and rich investor Louis (Dan Aykroyd), whose places in society are switched by two cruel billionaires. In this scene, Louis – driven to the edge by being cut off from his friends, house and bank account – sneaks into a party as Santa, steals a salmon, gets thrown off a bus and attempts suicide.

Xmas Factor: Duh. He’s dressed as Santa.

Sob Factor: Duh. He tries to kill himself. And what a waste of a whole salmon. What would that cost, like thirty, forty pounds sterling?

#9 – An adorable green child is persecuted by his classmates (How the Grinch Stole Christmas)

This is a Christmas classic, telling the story of a horrid green creature who hates Christmas and everything it stands for. In this scene, we learn why…

Xmas Factor: He’s making a beautiful Christmas angel for his beloved. Hopefully when he gives it to her, they’ll hug and go back home for mince pies and lashings of joy.

Sob Factor: He’s ostracised already because of his unusual looks and still he goes to the effort of shaving his whiskers and crafting a beautiful handmade gift for his love. And what does he get in return? Hatred. Hatred and fear. Merry Christmas, ugly children of the world.

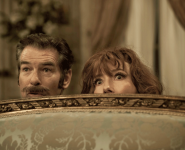
#8 – A Christmas Eve suicide attempt (The Apartment)

This comedy drama from Billy Wilder centres on Jack Lemmon’s character, C.C. Baxter, a man who lends his apartment to the men he works for so they can conduct affairs. Into his life arrives Fran (Shirley MacLaine), who – in this scene (3:30 minutes in) – attempts suicide in his flat on Christmas Eve, after discovering at the office Christmas party that her lover is seeing someone else.

Xmas Factor: It’s Christmas Eve! And there’s just been an office party! What could be more fun? Coworkers smooching under the mistletoe, ladies photocopying their bums, Tim and Dawn FINALLY getting together. You know. Great times! “Hey everybody, you’re all getting Christmas bonuses! And puppies! Puppies for all!” – the boss, wearing a Santa outfit, doling out Heston Blumenthal mince pies.

Sob Factor: This Christmas Eve, the only bonus everyone will be getting is heartbreak and death. And don’t expect it to be giftwrapped.

#7 – Pigeon lady is heartbroken (Home Alone 2)

In Home Alone 2, little Kevin McAllister is stranded again (what are the chances!). He keeps seeing this weird lady with loads of pigeons, but after she helps him escape from the baddies he changes his mind about her. They retreat to her home (the attic of some huge concert hall for some reason), listen to Christmas music and she explains the whole hobo look.

Xmas Factor: They’re listening to an orchestra play “O Come All Ye Faithful”. You know, the one that everyone sings right at the end of the Christmas morning service just when you’re about to finally get out of church, go home and open all your presents. It’s a carol forever associated in our hearts with the relative nearness of new Barbies.

Sob Factor: “Don’t be silly,” you’re thinking, “she’s just a hobo! A dirty bum! And they certainly don’t have feelings!” Our sentiments EXACTLY friends. But then you learn that she used to have a job AND a husband. Now all she has is a fuck ton of pigeons and a Macauley Culkin. May God be with her.

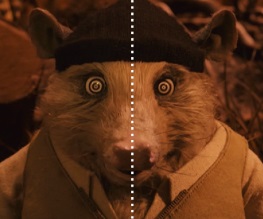
#6 – Nothing good ever comes of ice sculpting (Edward Scissorhands)

It’s Edward Scissorhands, everyone’s favourite emo hairdresser. In this scene, Edward is making one of his ice sculptures and Winona is having a dance around only for Edward to accidentally slash her hand. Well he does have scissorhands. This would be less of a problem if they were those safety scissors. Or pipe cleaners.

Xmas Factor: It’s Christmas and he’s making ice sculptures. Plus, look at the snow! This guy actually invented snow! What a guy.

Sob Factor: He accidentally harms his beloved Kim and then is bullied by Anthony Michael Hall: “You can’t touch anything without destroying it”. Totally heartbreaking.

#5 – Young Frank has his spirit crushed by his father (Scrooged)

Scrooged is a modern retelling of the Dickens classic A Christmas Carol in which the Scrooge character is a soulless TV executive who hates the holidays (we’re starting to hate them too). In this clip, we learn why.

Xmas Factor: It’s Christmas. It’s the Christmas Carol. Whatever. This list is starting to become a terrible burden.

Sob Factor: He’s only a little boy! What’s a little boy going to do with five pounds of veal?! He wants a train set, that’s all he wants in the world. And all he gets is the dead flesh of a baby cow, and a harsh life lesson from his mean old dad. Talk about having your Christmas spirit crushed.

#4 – Snape is cheating on you, Professor Trelawney (Love Actually)

It’s Love Actually, you all know the drill. And it’s in Spanish! Feliz Navidad.

Xmas Factor: The scene opens with Emma T. opening a Christmas present. What should happen here is that it’s that butt ugly necklace and then her and Snape kiss and it’s all Christmassy.

Sob Factor: As we’ve covered before, this moment is a BFF weepy favourite. It’s a combination of things: Emma Thompson’s wonderfully realistic crying; the direction, with the camera framing her standing alone, cutting back to family photos; and of course Joni Mitchell playing in the background. How could you do it, Snape? How COULD you? We’d Avada Kedavra you right now if we could.

#3 – An adorable green sock is DEAD (The Muppets Christmas Carol)

Quick question: wouldn’t Miss Piggy’s and Kermit’s kids be terrifying frog/pig hybrids? Green-skinned piglets with webbed feet? Amphibious pigs? They’d be amphibipigs, for crying out loud. Watch from 5 minutes in for the unrealistic children.

Xmas Factor: It’s the muppets celebrating Christmas! This should be great.

Sob Factor: A tiny, adorable green sock is dead and gone and everyone is saying things like, “Tiny Tim always loved watching the ducks on the river”. Need we say more, you heartless beasts? For the real kicker, pause at 7’32″ and check out Tim’s little cane, scarf and hat resting on the chair. A shrine to the dead amphibipiglet.

#2 – A terrifying parallel universe (It’s A Wonderful Life)

It’s A Wonderful Life – possibly the most famous Christmas film ever? It tells the story of a man who loses a bunch of money and tries to kill himself. You know, Christmas stuff. Watch from 1:38:40 for suicide funsies, 1:46:00 onwards for parallel universe lols.

Xmas Factor: It’s set at Christmas/it’s snowy.

Sob Factor: Ha! This is so depressing! The nicest man in the world wants to kill himself and then has to bear witness to a terrifying parallel universe – only marginally less awful than the one in Back to the Future 2.

#1 – Farewell, my snowy friend (The Snowman)

The Snowman is a Christmas classic, featuring lovely animation from Raymond Briggs’ book and – of course – the dulcet tones of a wee choir boy (not Aled Jones, apparently) singing haunting theme song “Walking In The Air”. Watch from 6:55 onwards to capture the little boy’s wide-eyed, Christmas-morn joy. And the subsequent tragedy.

Xmas Factor: What could possibly be more Christmassy? A little boy builds a snowman that comes to life and then flies him around the world, where he meets loads of other snowmen and then Father Christmas!! That sounds so exciting we all just wet ourselves in unison!

Sob Factor: The snowman, the magical wonderful flying friend DIES. We’re fine with kids films being sad. But this is a whole other level. Where’s the redemption?! There’s no room for redemption! It just ends with the little boy looking at the melted remains (i.e. corpse) of his snowman friend. What is the message here? “Don’t get too attached to your childhood friends, kids, they’re all inevitably going to melt”? Is that the message?! This ending shits all over Christmas Day, like when your cat eats a strand of tinsel off the tree and then walks around the rest of the day with said tinsel trailing out of its bum, and eventually you have to bite the bullet and pull the tinsel out and for the rest of the day none of your family can look you in the eye. That is the literal equivalent of the ending to The Snowman.

How do you feel now? Super depressed? Good. That’s the way it should be. Now if you don’t mind, we’re going to go lie down and close our eyes for a long, long time and hopefully when we open them Christmas will be over. Either that or we’ll all be dead.


Add A Comment

*
*
*

Comments for Top 10 Emotionally Devastating Christmas Moments

  1. Mix pretty much equal parts of the paelpsauce and the cinnamon until you get it to be a nice clay consistancy. Roll the dough out on wax paper until it is 1/4 to 1/2 inch thick. Use the cookie cutters to cut out holiday shapes. With the straw, poke a small hole towards the top of the shape. Put the shapes in a warm spot to dry, this takes a few days! Once your sweet-smelling ornaments are dry you can string a 8 10 inch piece of ribbon through the hole you made with the straw and hang it up!Go for a walk and gather some acorns. Take them home and paint them different colors. Let them dry.Cut the metalic stems in half and bend over so both ends are together. Use a hot glue gun to attach the chenille stem to the top of the acorn to work as a hanger.Using the scrap felt, cut 2 small teardrop-shaped pieces about 3-inches long. Lay the candycane on top of one of the teardrop-shaped pieces of felt, noting in the graphic how the candy cane hangs out over the edge. Cover with the other teardrop-shaped piece of felt. Glue the 2 pieces together, sandwiching the candy cane in the middle and lining up the edges.Using the graphic below as a guide, glue the nose and eyes in place. Cut two small circles about 1-inch across to be the ears. Cut 2 smaller circles out of a contrasting colors and glue them the center of the 1-inch circles. Glue the ears in place. Glue on the whiskers.Trace around the CD onto a piece of felt. Cut out the felt circle.Cut a 10-inch piece of ribbon. Tie the ribbon into a loop. Put a dab of glue onto the back of the CD towards the outside edge. Press the ribbon loop into the glue to make the hanger.Spread glue over the entire back of the CD. Center the felt circle on glue and gently press. This will cover writing and ribbon ends, and it will be the back of your ornament.Cut around the figure in the picture you are using. You can cut it into a rectangle shape, circle, or whatever you want. For a fancy edge, use pinking sheers!Trace the picture onto a piece of felt. Cut out the shape, making it about 1/2-inch wider than the picture. Glue the photo onto the piece of felt so you can see the felt on all sides. Glue this onto the center of the CD, making sure you cover the hole completely.Hot glue the 12 mm. and a 10 mm. faceted crystal bead together hole to hole. Cut 4 wires, approximately 3-4 inches long, and string each wire with 8 small crystal bugle beads. Leave about a 1/2 inch gap between the first 4 beads and the last 4 beads. Bend the ends of the wire so the beads won’t fall off. Twist the 4 wires together at the 1/2 inch gap, forming 8 legs. Hot glue the twisted section of the legs to the underside of the crystal beads, right where the 2 crystal beads join together. Take aproximately 10 of silver metallic thread and tie it around the middle of the spider , and tie the ends together to make a loop for hanging. Bend legs to look like a spider.This is adorable and very simple!Christmas Spider LegendOn Christmas eve, a long time ago, a gentle mother was busily cleaning the house for the most wonderful day of the year Christmas day, the day on which the little Christ child came to bless the house. Not a speck of dust was left. Even the spiders had been banished from their cozy corner on the ceiling. They had fled to the farthest corner of the attic.The Christmas tree was beautifully decorated. The poor spiders were frantic, for they could not see the tree, nor be present for the little Christ child’s visit. Then the oldest and wisest spider suggested that perhaps they could wait until everyone went to bed and then get a closer look.When the house was dark and silent, the spiders crept out of their hiding place. When they neared the Christmas tree, they were delighted with the beauty of it. The spiders crept all over the tree, up and down, over the branches and twigs and saw every one of the pretty things.The spiders loved the Christmas tree. All night long they danced in the branches, leaving them covered with spider webs. In the morning, when the little Christ child came to bless the house, he was dismayed! He loved the little spiders for they were God’s creatures, but he knew the mother, who had worked so hard to make everything perfect, would not be pleased when she saw what the spiders had done.With love in his heart and a smile on his lips, the little Christ child reached out and gently touched the spider webs. The spider webs started to sparkle and shine! They had all turned into sparkling, shimmering silver and gold.According to legend, ever since this happened, people have hung tinsel on their Christmas trees. It has also become a custom to include a spider among the decorations on the Christmas tree.(For Christmas gifts I made one spider for the Christmas tree. I printed out this story on fancy Christmas paper and put it in a frame. I then made another spider, with out the string, and glued it to the edge of the frame.) 1. Blow up balloons (at a size to fit your palm). 2. Smear the starch all over the balloon (or use your favorite paper mache recipe). 3. Put the pieces of newspapers all over the starch Let dry. 4. Repeat this procedure three times. 5. When you get the newspaper completely dried, pop and take out the balloon. 6. Decorate it with seeds using glue. The impression would be better if you put the seeds in some order to make a nice relief. 7. Paint it with one color only, to put the accent on the relief design. 8. Tie the lace on the match 9. Put the match inside the ornament to be the hanger.Begin by taking off the top and washing out the glass ball ornament. Allow it to dry fully. Use the egg carton to hold the ornament, so it doesn’t roll off your table.Choose your shells and various beach items and clean them. They have to be small enough to fit into the top of the glass ball ornament. Use the funnel and fill the glass ball with sand about one third of the way. Add the shells and beach items.Put the top back on the glass ball ornament and add some Christmas ribbon as a hanger. In order to tie a bow for the hanger, you’ll need to do a square knot and then tie the bow. This way it will not come out when the ornament is hanging on the tree.Enjoy!I’ve done these with 3 year olds. Older kids can do more of the process themselves.Holding the cone by the base, place glue all along the inside rim of the cone. Have the child place the ball ornament on the cone with the hanging part straight up.When that is dry (that’s why hot glue works great), either you or the child can drizzle some white paint on the top of the ball.Sponsored LinksLightly spray the cone part with acrylic (don’t get too close with the acrylic can while you are spraying or it may melt the cone) to seal it. Tie a colorful ribbon through the loop and you’re ready to give these as gifts or hang them on the tree!Note: Use a sharpie to write the child’s name and year on the base before you spray the acrylic.I saw these several years ago in a preschool classroom and have been making them since. Everyone who sees these RAVES over them. They are one of the few crafts that can be done by the younger set that are also saleable for Christmas fairs and fundraisers. Let’s face it, we’ll all put our kids’ crafts on OUR trees, but would a stranger buy them? They will buy these! * Elbow macaroni * Bowtie pasta * Ziti noodles (this looks like a giant macaroni with groves on the outside with an arch in it) * Gold pipe cleaners * White and gold paint * Medium sized clear faceted balls or round wooden balls with a face * Glue gun and sticks * Paintbrush * Glitter (optional) * Ribbon (so they can hang from the special spot, silly)Instructions:Step one: Paint the elbows and ziti white. We use Apple Barrel brand paint, easy clean up. Paint bowties gold or glittery silver. We paint them gold.Preheat oven to 350 degrees. Spray foil lined cookie sheet with non-stick spray.Color any way you choose with the permanent markers on the outside and/or inside the clear tumbler. When colored to your satisfaction (not all spaces have to colored) place cups on foil and into the oven.Check after a minute and watch closely. The cup will melt and you do not want it to burn.Each cup will melt in a different shape; play with the placement. Remove from foil when slightly cool to keep from sticking.When completely cool, make a hole with the hot tip of the glue gun and string a ribbon thru the hole to hang in window or on tree.This project requires an adult to help but is great for all ages from 2 years old and up.Here’s what you’ll need to make your own Dancing Princess beaded Charm: * One 2 1/2 inch long, gold-colored headpin * Five 3X11mm two-tone pink Dagger Beads * One pale pink 8X6mm Center-Drilled Bell Flower bead * One 10mm crystal/pink Glass Angel Wings bead * One Delica bead color number DB 214 * One gold-colored size 15.0 seed beadAdd the five dark pink dagger beads to a short piece of Nymo thread. Gather the dagger beads into a loose circle, then tie a surgeon’s knot in the Nymo thread. Be sure that you don’t pull the beads together too tightly, Leave some slack so that the beaded overskirt will hand properly, If you pull the beads together on the thread too tightly, they will pucker and not drape properly over the pale pink bead when you assemble the Dancing Princess Beaded Charm.Begin the assembly of the Dancing Princess Beaded Charm by placing the light pink bell flower bead onto the gold headpin.Place the circle of dagger beads that you made earlier over the light pink bell flower bead. Make sure they are not gathered too tightly, and that they hang properly, to resemble an overskirt atop the the bell flower petticoat beneath. It’s Ok if you can see a bit of thread between the dagger beads; this means it will drape properly over the bell flower bead.Once the overskirt is in place, add the single Delica DB 214 bead to the headpin. Check the overskirt of dagger beads once more, to make sure it is sitting on the headpin properly.Now you’re going to add the remaining beads to complete the Dancing Princess Beaded Charm. Over the Delica midsection bead, place the Angel Wing bead, with the tips turned up, so that, when viewed from the side, it looks like the letter U. Once the angel wing bead is in place, add the size 15/0 gold seed bead, then the pearl, then the gold plated daisy spacer bead to complete the assembly of the Dancing Princess Beaded Charm.Using your round and flat pliers, make a Wrapped Loop on the headpin. Your Dancing princess Beaded Charm is now ready to be hung from a strand of silk, an organza ribbon, a delicate chain, or a beaded necklace. Make two Dancing Princess Beaded Charms and attach them to a set of ear wires for a delightful pair of Dancing Princess earrings. However you choose to wear your dancing Princess Beaded Charms, I hope you’ll enjoy them!Add the gold 15/0 bead, the tiny round pearl, and the gold plated daisy spacer bead to complete your Dancing Princess Beaded Charm * bd cup salt * 1 cup flour * bd cup water * Rolling pin * Cookie sheet * Toothpick * Miniature cookie cutters: star and Christmas tree * Acrylic paints: green, yellow, and various colors of your choice for tree ornaments * Glitter glue or glitter paint * ribbonWhat You Do 1. Preheat the oven to 250 degrees F. 2. Mix together, salt, flour, and water until dough is formed. 3. Knead the dough on a floured surface until the mixture is elastic and smooth. If dough is too sticky, sprinkle with flour, continue to do so until stickiness is gone. Do not add too much flour, this will dry out the dough and will cause it to crack before you get a chance to bake it. 4. Roll out the dough to about bc” thick with a rolling pin that has been dusted with flour. 5. Use cookie cutters to cut out as many trees and stars as you want. 6. Use a toothpick to make a hole toward the top of the shape. Poke the toothpick into the shape, then holding toothpick straight up and down, make a circular motion as if you were stirring something. Keep circling until the hole is the size you want. 7. Place all shapes onto an ungreased cookie sheet and place into the preheated oven. 8. Bake for 2 hours. 9. Remove from oven and allow to cool completely. 10. Paint the trees green and the stars yellow. 11. Use the handle end of the paint brush to dot on ornaments by dipping into paint then dotting onto ornament. 12. When paint is dry, use glitter glue (we used green) or glitter paint (we used gold) to put a sparkling cover coat on your ornaments. 13. When dry, thread ribbon through hole and tie in a knot in the back. 14. Tie onto package.Helpful Hints * If your toppers are large enough, you can make two holes in each so that you can thread ribbon through like a button, only showing a small amount of ribbon on the front. * These make adorable pins to wear to school. Just don’t make a hole. Glue a pin back to the back of the completed ornament instead. * Uncooked salt dough doesn’t keep well, so only make enough dough for the ornaments you are going to make. If you are only making a few toppers, halve the ingredients above. The listed amounts will make enough ornaments for a classroom of 20. * Small balloon * Fabric stiffener * Hot glue gun or strong glue * Ribbon and other things to decorate it * String or yarn for a hanger * Spray paintHow To Make It 1. Blow up the balloon. 2. Cover it with fabric stiffener. 3. Wrap yarn in every direction. (Make sure to get it on the top.) 4. Let it dry. 5. Pop the balloon. 6. Then spray paint it. 7. Put a hanger on it. 8. Decorate with flowers or anything you want, but make sure it’s not too heavy.For a Victorian potpourri ornament: * Round clear Christmas ornaments that you can purchase at craft or variety stores * Loose potpourri * Dried or fake rosebuds * 1/2 inch Ribbon, optional * Glue gunHow To Make It 1. Carefully remove the top, hanger-portion of the ornament. 2. Push the potpourri into the ornament until full. 3. Replace the top back onto the ornament. 4. Cut the rosebuds away from the stems. Using your glue gun, glue the rosebuds in a circle around the top of the ornament. 5. If you wish, glue a gathered ribbon beside the cluster of rosebuds. 6. Attach a standard ornament hanger, or another piece of ribbon to the top and it is ready to be hung on the Christmas Tree. You can be simple or extravagant when you make these (i.e., paper ribbon and fake roses as opposed to velvet ribbon and real dried roses) but they come out looking great! Merry Christmas!Step two: Cut each gold pipe cleaner into four equal parts.Christmas Angel OrnamentsBuy Christmas Angel Ornaments. The savvy shopper’s secret weapon!PriceGrabber.commake loop and twist ends together, this should look like a halo. stick twisted ends into the hole at the top of the ball, this should look like the halo over a head.Step three: Take a length of ribbon and make a loop big enough to fit over the tree branch or the place where it will hang. Glue it to the bowtie, then glue the wings on the ziti in the small arch. Glue two elbows to sides but letting them touch in the front of angel.Step four: Put glue on upper mouth of ziti (the one closest to the wings) and attach the head. Let dry and taaaadahhhh, you have a pasta angel.